For enthusiasts dedicated to scale model accuracy, especially when it comes to iconic vehicles like the Alfa Romeo 8c, even minor details like the wheels can make a significant difference. If you’ve encountered the Italeri Alfa Romeo 8C kit, you might have noticed the wheels, while decent, could benefit from enhanced realism. Many modelers seek aftermarket options, but often these deviate from the authentic Alfa Romeo 8C wheel design. This guide details a challenging yet rewarding journey of modifying the kit’s original wheels to achieve a more accurate and visually stunning result. This isn’t a simple task, but for those who appreciate the finer points of model building, the effort is well worth it.
The Challenge of Italeri Wheels and the Quest for Realism
Modifying the Italeri Alfa Romeo 8C kit wheels presents a unique set of challenges. Unlike readily available aftermarket wheels, sticking with the kit components ensures fidelity to the original model design. However, achieving a truly realistic spoked wheel appearance from solid plastic requires meticulous work. Initial attempts to directly drill the kit wheels often prove unsuccessful due to the material and intricate design. This necessitates a more strategic approach, focusing on creating custom tools to guide the modification process.
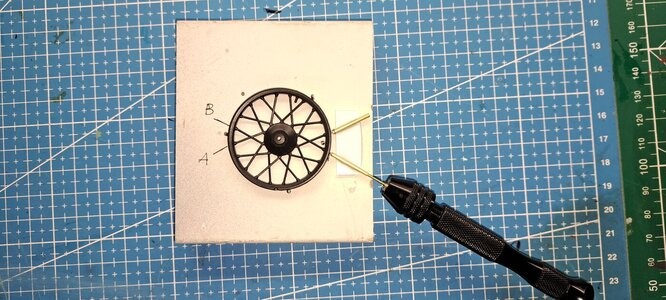
Crafting Custom Drilling Jigs for Precision
To overcome the limitations of freehand drilling, the key lies in fabricating precise drilling jigs. These jigs act as guides, ensuring accurate and consistent hole placement for the spokes. Two distinct jigs are required: one for the outer and inner rims, and another for the center rim. Constructing these jigs involves careful measurement and design to match the wheel’s curvature and desired spoke pattern. The jigs are engineered to allow drilling from the outside of the rim, offering better control and visibility. Small tubes are then integrated into the jigs as drill guide bushings. These bushings, glued at the correct angle and height, ensure each hole is drilled with precision, a crucial step in achieving a professional finish.
Outter and inner rim drilling jig
Center rim drilling jig
Precision Drilling Techniques for Rims and Hubs
With the drilling jigs prepared, the next phase involves the delicate process of drilling. For the rims, the jigs provide a stable and accurate guide, allowing for consistent hole spacing and alignment. The center rim, handled by its dedicated jig, receives the same level of precision.
The wheel hub requires a different approach. Paper templates, while initially considered, prove inadequate for the required accuracy. Instead, thin aluminum strips are cut to match the circumference of the hub’s large and small diameters. Holes are pre-drilled into these flat strips using a paper template as a guide. These strips are then carefully rolled and glued onto the hub, creating a solid and accurate drilling template. This innovative method allows for redrilling the hub using the aluminum strips as guides, ensuring precise and evenly spaced spoke holes.
Drilled out center rim
Hub with tooling mandrel
Drilled out flat strip
Gluing strips to hub
Redrilled hub
Replacing Molded Nipples for Enhanced Detail
Since the drilling is now executed from the outside of the rim, the kit’s molded plastic nipples become unusable. To maintain authenticity and enhance detail, these are replaced with micro aluminum tubing. Cut to the precise length, these metal tubes mimic the appearance of real wheel nipples far more convincingly than plastic. While cutting and placing each nipple is a time-consuming task, the improved visual fidelity is undeniable. An Exacto knife proves to be the ideal tool for this delicate and repetitive process.
The Lacing Process: Bringing the Wheel to Life
With the rims and hubs drilled and nipples replaced, the final stage is lacing the spokes. This process, while straightforward in concept, demands patience and a steady hand. Each spoke is carefully threaded through the pre-drilled holes and into the corresponding nipple. This meticulous work gradually brings the wheel to life, revealing the intricate spoked design.
Nipple insertion (the white on the hub is putty)
Inner rim lacing complet
Comparing Modified and Kit Wheels: A Striking Difference
The effort invested in modifying the wheels becomes strikingly apparent when comparing the respoked wheel to the original kit wheel. The difference in realism is significant. The finer spokes, metal nipples, and overall enhanced detail elevate the model’s appearance considerably. Interestingly, even the box art of the kit hints at the desire for metal-spoked wheels, showcasing the aesthetic improvement achievable through this modification.
Curiously, the box art shows metal spoke wheel rather than the plastic ones.
Conclusion: The Reward of Customization
While this guide details the modification of the first of six wheels (a testament to the kit’s unique, albeit perhaps excessive, parts provision), it represents a significant learning curve. Each subsequent wheel benefits from refinements in technique and jig design, promising even better results. The intention is to paint only the rims and hubs, leaving the spokes and nipples in bare metal for a more authentic look. Even the valve stem is repositioned for accessibility, demonstrating the level of detail considered. The respoked wheel, placed next to the original kit wheel, clearly showcases the transformative impact of dedicated modification. For modelers seeking to elevate their Alfa Romeo 8C build to the next level of realism, this wheel modification is a challenging yet ultimately rewarding endeavor.